Sunday, August 26, 2012

BOWLING TEAM SHIRTS
My hubby called and said his work needed bowling costumes, could I give suggestions.  Of course, I sent them fun, crazy ideas.  They mellowed me out, and this is the final product.

 Real bowling shirts that needed adjusting.

 Each team member needed a letter of the company logo on the back of their shirt.  First step, print the logo letters the size dsired and in the same font as the company logo. Next gluestick them to the fabric choosen for the letter.  I just used a cotton broadcloth that matched the yellow in the shirt.

Company Logo

 Now we are ready to cut.  I love using a rotary cutter.  Make sure your blade is sharp.  Also cut on the correct surface, it will leave lines.  I have a cutting mat.

 I cut the letters two layers thick so the letters appear more yellow, and the black of the shirt does not show through.  Glue the two layers together for stability.

 Make sure the letter is centered on the back of the shirt and gluestick it to the shirt.

 Besides glue sticking, pin to make sure the letters are stable.  You do not want the letters to shift while you are satin stitching the edges.  For satin stich set your machine to zig zag and stitch length to 0.5.

 The finished product on the backs of the shirt.

As a final touch I hand embroidered their names on the front.  My embroidery machine is not in service, but I still think they turned out nice. 
   
NOW WE'RE HOOKED UP!!
 The old hooks. My youngest got a little crazy pulling her jacket off and broke it. Not sturdy at all. It was cute while it lasted, only one winter season.
My new idea.  A friend helped me cut the boards since my saw will not cut angles.
 Sanding...
 Painting 3 coats.
 The finished product...well almost.  The flower is attached at the top, but the bottom is loose.  A Bella mishap would ruin them for sure; so, I anchored the flowers better. Aunt Margaret gave me the flowers.
 This picture shows how they hang crooked without anchors.
 The clip I choose to use. I modified it by bending with pliers.
 The clip screwed into the wall.
After screwing, I bent the clip around the flower. Now it is secure, and looks clean.  Hopefully my exuberant Bella won't rip or break these hooks.

Sunday, August 19, 2012

HAIR HAIR N MORE HAIR
Thank goodness I have little girls.  I love to do hair.  Here are some hairstyles I have done in the past.


Thank goodness I have little girls.  I love to do hair.  Here are some hairstyles I have done in the past.

Saturday, August 11, 2012

DIY BACK TO SCHOOL SHOES

My mom is brilliant.  She came to visit the girls, and of course she brought a craft to do with them. 
 We pulled out my fabric markers, colored sharpies, and glitter puff paint.  The girls attacked their shoes.  THEY LOVE THEM!!!

After letting my youngest wear hers for awhile, I decided I needed to put in elastic no tie laces.  We added buttons with shanks to decorate the laces. 


What a way to spice up that drab uniform my oldest is going to have to wear.  She is so proud of her artsy shoes made by herself.

Thursday, August 9, 2012

SCHOOL UNIFORM UPCYCLE
It's that time of year!  My 5 year old is entering school for the 1st time and has been asked to wear a uniform.  I have mixed feelings about this, only because I love clothes.  We had to order shirts from the uniform company, but were informed that we could obtain the rest from other vendors as long as it is navy blue or khaki.   So of course I remade something.  I might be getting her in trouble since it is a variation. We'll see what the school says.

 Here are two examples of a school uniform jumper.
 An adult crepe de chine skirt, that I never really wore.
 The pins mark where I am going to sew to take it in from the center back seam. I only sew it down to the bottom pin.

Now I am taking the extra fabric and centering it on both sides of the CB.  I will sew it down to the end of the pin. Two seams here.
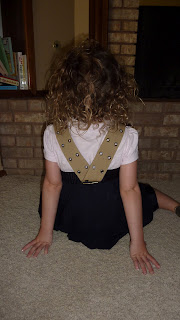
 The skirt is now smaller and is ready for straps.  Khaki belt and a trusty hanger. The belt has an adjustable slide to change the length of the belt.  This is important.

 Bent a hanger and made a metal loop.
 Sew the metal loop on the CB.
I cut the belt buckle off  and attatched to the skirt. (Seen on the left).  Feed the cut end through the back loop, then sew the cut end to the skirt. (Seen on the right.)

 Finished Product.


What do you think?  Will she get in trouble?  Personally I think it is a step up from the drab uniform shown above....but my 5 yr old hates confrontation like me.
BIG BEAR FOR YOUNG FAMILIES
 We have gone to Big Bear a few times with our young family, and we love it.  Here is what we did, and I would recommend it to anyone.
 Big Bear Discovery Center.  Here you can touch stuffed animals, and learn about the surrounding area.  Also you can buy day parking passes here for the San Bernadino forest.
 Woodland trail hike.  Our 5 year old loved this!! It has markers with descriptions about the surrounding flora.  http://www.localhikes.com/Hikes/WoodlandTrail_4472.asp   We also walked around part of the lake on the south side.
 Time Bandit pirate ship ride at Holloway Marina.  The ship takes you around the whole lake.  The girls loved being pirates.  http://www.bigbearboating.com/pirateship.php
Meadow Park Swim beach.  There was sand volleyball, fun inflatable objects, swings, and nice sand on the shore. http://kbhr933.com/current-news/swim-beach-open-summer-family-season-passes/

Of course there are other things to do up there, like biking, boating, day hikes, fishing, etc. For us with young kids this worked perfect :)  There are lots of great places to eat there as well.  We ate Mexican at the EL AZTECA, and at B's Barbeque.